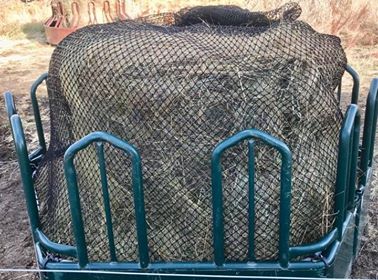
{"id":6791828013161,"title":"TKKIT-EXFEEDER-1.5HD Kit-EZ Feeder- Large 1.5\" HD","handle":"233355574-kit-ez-feeder-large-2-hd","description":"\u003cp data-mce-fragment=\"1\"\u003e1.5\" feeding holes. Heavy duty.\u003c\/p\u003e\n\u003cp data-mce-fragment=\"1\"\u003eEZ Feeder Net Kits attach an EcoNet to \"your\" round bale feeder to create an all-in-one slow feeder system. They work on all types of feeders, metal, poly, composite, wood, round, square, or a combo of all of these.\u003cspan data-mce-fragment=\"1\"\u003e \u003c\/span\u003eWill help you create a slow feeding system, that suits you. \u003c\/p\u003e\n\u003cp data-mce-fragment=\"1\"\u003eCustomers have used these to attach onto store-bought feeders of all kinds, homemade feeders, elevated \u0026amp; ground level, even upside down where they drop the bale in from the top!!\u003c\/p\u003e\n\u003cp data-mce-fragment=\"1\"\u003e\u003cspan data-mce-fragment=\"1\"\u003e\u003c\/span\u003eTo Install:\u003cbr data-mce-fragment=\"1\"\u003e\u003c\/p\u003e\n\u003col data-mce-fragment=\"1\"\u003e\n\u003cli data-mce-fragment=\"1\"\u003eOpen up the packaging (preferably in a warm area). Gather the hardware parts (hose, 1 connector, 2 hose clamps, + zip ties) and you'll need a flat screwdriver \u0026amp; hose cutter\/exacto knife. We suggest weaving the hose where it's warm \u0026amp; then taking it out to your feeder.\u003c\/li\u003e\n\u003cli data-mce-fragment=\"1\"\u003eStretch out the net and starting at the seam of the open end, fold over the edge of the net to make 2 layers.\u003c\/li\u003e\n\u003cli data-mce-fragment=\"1\"\u003eStarting at the seam, begin weaving the hose thru every other opening of the folded over edge. Slide the woven net further onto the hose and continue until the net is completely woven onto the hose.\u003c\/li\u003e\n\u003cli data-mce-fragment=\"1\"\u003eInsert the connector into one end of the hose, add the clamp and tighten. Then connect the opposite end of the hose (temporarily) so the net doesn't come unwoven. \u003c\/li\u003e\n\u003cli data-mce-fragment=\"1\"\u003eThen set the assembled net inside your feeder. Slide the net over the hose so it is fairly evenly distributed around the inside of your feeder.\u003c\/li\u003e\n\u003cli data-mce-fragment=\"1\"\u003eNow figure out where you will be attaching the hose to the\u003cspan data-mce-fragment=\"1\"\u003e \u003c\/span\u003e\u003cspan data-mce-fragment=\"1\"\u003einside\u003c\/span\u003e\u003cspan data-mce-fragment=\"1\"\u003e \u003c\/span\u003eof the feeder. *Do not attach to the very bottom (when you lift the feeder the net may stay frozen to the ground) We suggest attaching it closer to the top horizontal rungs.\u003c\/li\u003e\n\u003cli data-mce-fragment=\"1\"\u003eStart attaching the hose to the feeder with the zip ties provided, about 1 ft apart, all the way around, making sure the net is evenly spaced. Once you know how much extra hose there is, cut off the excess, re-attach the connector \u0026amp; tighten the clamp. Then add more zip ties as needed.\u003c\/li\u003e\n\u003cli data-mce-fragment=\"1\"\u003eSet bale on its side (flat ends on either side), remove twines \u0026amp; set feeder over the bale.\u003cbr data-mce-fragment=\"1\"\u003eAll done!\u003c\/li\u003e\n\u003c\/ol\u003e\n\u003cstrong data-mce-fragment=\"1\"\u003e\u003cbr data-mce-fragment=\"1\"\u003eTips:\u003cbr data-mce-fragment=\"1\"\u003e\u003cbr data-mce-fragment=\"1\"\u003e\u003c\/strong\u003e\u003cspan data-mce-fragment=\"1\"\u003e\u003c\/span\u003e\n\u003cp data-mce-fragment=\"1\"\u003e- If the feeder is smaller in diameter than the hose, disconnect 1 end of the hose from the clamp, slide the net away from the open end of the hose \u0026amp; continue with step 5.\u003cbr data-mce-fragment=\"1\"\u003e\u003cbr data-mce-fragment=\"1\"\u003e- If your feeder is open or has rungs at the bottom, close it in with netting, belting, or puck board (if possible) before installing the EZ Feeder Kit. ** We now offer netting strips to help enclose the bottom of open feeders, install these on the inside of feeders so horses cannot paw + get caught on the net.\u003c\/p\u003e\n\u003cp data-mce-fragment=\"1\"\u003e- place your feeder in a spot that has wind protection\u003c\/p\u003e\n\u003cp data-mce-fragment=\"1\"\u003e- place shavings or straw before you set out your bale to prevent freezing \u003c\/p\u003e\n\u003cp data-mce-fragment=\"1\"\u003e- customers have set down railroad timbers where they plan to feed\u003c\/p\u003e\n\u003cbr data-mce-fragment=\"1\"\u003e\u003cstrong data-mce-fragment=\"1\"\u003eOther Feeder Types:\u003c\/strong\u003e\u003cbr data-mce-fragment=\"1\"\u003e\u003cspan data-mce-fragment=\"1\"\u003e\u003cbr data-mce-fragment=\"1\"\u003e- If you have a lightweight feeder, you can roll the feeder with the net kit attached to the bale and then set it over the bale.\u003cbr data-mce-fragment=\"1\"\u003e\u003cbr data-mce-fragment=\"1\"\u003e\u003c\/span\u003e\u003cspan data-mce-fragment=\"1\"\u003e- Another option for people with really big feeders is to not attach the hose to the feeder, drop the bale into the feeder, then set the net back over the bale and use velcro or re-usable zip ties, so you are able to attach + un-attach to the feeder as needed.\u003cbr data-mce-fragment=\"1\"\u003e\u003cbr data-mce-fragment=\"1\"\u003e\u003c\/span\u003e\u003cspan data-mce-fragment=\"1\"\u003e- Basket feeders are set up so the hose + net is removable to put hay in. Use velcro or zip ties that can be re-used to attach the hose to the feeder.\u003c\/span\u003e","published_at":"2022-01-26T14:17:19-06:00","created_at":"2022-01-26T11:14:09-06:00","vendor":"Paradise Hill Ranch and Western Wear","type":"HAY NETS\/BAGS","tags":["HAY NETS\/BAGS"],"price":55000,"price_min":55000,"price_max":55000,"available":true,"price_varies":false,"compare_at_price":null,"compare_at_price_min":0,"compare_at_price_max":0,"compare_at_price_varies":false,"variants":[{"id":39840068501609,"title":"Default Title","option1":"Default Title","option2":null,"option3":null,"sku":"35557","requires_shipping":true,"taxable":true,"featured_image":null,"available":true,"name":"TKKIT-EXFEEDER-1.5HD Kit-EZ Feeder- Large 1.5\" HD","public_title":null,"options":["Default Title"],"price":55000,"weight":454,"compare_at_price":null,"inventory_quantity":2,"inventory_management":"shopify","inventory_policy":"deny","barcode":"","requires_selling_plan":false,"selling_plan_allocations":[]}],"images":["\/\/paradisehillranchandwesternwear.com\/cdn\/shop\/products\/LargeEZfdrnewbale_2048x2048_742a457e-0a0c-44f9-815d-6cb1eff14474.jpg?v=1643228210","\/\/paradisehillranchandwesternwear.com\/cdn\/shop\/products\/emptyLageEZFdr_2048x2048_2267bc15-35ba-4342-a793-010428ddec32.jpg?v=1643228210","\/\/paradisehillranchandwesternwear.com\/cdn\/shop\/products\/horseeatingatLgEZFdr_2048x2048_962c915d-d802-4da9-a36f-100fdbbca5d8.jpg?v=1643228212"],"featured_image":"\/\/paradisehillranchandwesternwear.com\/cdn\/shop\/products\/LargeEZfdrnewbale_2048x2048_742a457e-0a0c-44f9-815d-6cb1eff14474.jpg?v=1643228210","options":["Title"],"media":[{"alt":null,"id":21751862427753,"position":1,"preview_image":{"aspect_ratio":1.35,"height":280,"width":378,"src":"\/\/paradisehillranchandwesternwear.com\/cdn\/shop\/products\/LargeEZfdrnewbale_2048x2048_742a457e-0a0c-44f9-815d-6cb1eff14474.jpg?v=1643228210"},"aspect_ratio":1.35,"height":280,"media_type":"image","src":"\/\/paradisehillranchandwesternwear.com\/cdn\/shop\/products\/LargeEZfdrnewbale_2048x2048_742a457e-0a0c-44f9-815d-6cb1eff14474.jpg?v=1643228210","width":378},{"alt":null,"id":21751862460521,"position":2,"preview_image":{"aspect_ratio":1.332,"height":280,"width":373,"src":"\/\/paradisehillranchandwesternwear.com\/cdn\/shop\/products\/emptyLageEZFdr_2048x2048_2267bc15-35ba-4342-a793-010428ddec32.jpg?v=1643228210"},"aspect_ratio":1.332,"height":280,"media_type":"image","src":"\/\/paradisehillranchandwesternwear.com\/cdn\/shop\/products\/emptyLageEZFdr_2048x2048_2267bc15-35ba-4342-a793-010428ddec32.jpg?v=1643228210","width":373},{"alt":null,"id":21751862526057,"position":3,"preview_image":{"aspect_ratio":0.751,"height":373,"width":280,"src":"\/\/paradisehillranchandwesternwear.com\/cdn\/shop\/products\/horseeatingatLgEZFdr_2048x2048_962c915d-d802-4da9-a36f-100fdbbca5d8.jpg?v=1643228212"},"aspect_ratio":0.751,"height":373,"media_type":"image","src":"\/\/paradisehillranchandwesternwear.com\/cdn\/shop\/products\/horseeatingatLgEZFdr_2048x2048_962c915d-d802-4da9-a36f-100fdbbca5d8.jpg?v=1643228212","width":280}],"requires_selling_plan":false,"selling_plan_groups":[],"content":"\u003cp data-mce-fragment=\"1\"\u003e1.5\" feeding holes. Heavy duty.\u003c\/p\u003e\n\u003cp data-mce-fragment=\"1\"\u003eEZ Feeder Net Kits attach an EcoNet to \"your\" round bale feeder to create an all-in-one slow feeder system. They work on all types of feeders, metal, poly, composite, wood, round, square, or a combo of all of these.\u003cspan data-mce-fragment=\"1\"\u003e \u003c\/span\u003eWill help you create a slow feeding system, that suits you. \u003c\/p\u003e\n\u003cp data-mce-fragment=\"1\"\u003eCustomers have used these to attach onto store-bought feeders of all kinds, homemade feeders, elevated \u0026amp; ground level, even upside down where they drop the bale in from the top!!\u003c\/p\u003e\n\u003cp data-mce-fragment=\"1\"\u003e\u003cspan data-mce-fragment=\"1\"\u003e\u003c\/span\u003eTo Install:\u003cbr data-mce-fragment=\"1\"\u003e\u003c\/p\u003e\n\u003col data-mce-fragment=\"1\"\u003e\n\u003cli data-mce-fragment=\"1\"\u003eOpen up the packaging (preferably in a warm area). Gather the hardware parts (hose, 1 connector, 2 hose clamps, + zip ties) and you'll need a flat screwdriver \u0026amp; hose cutter\/exacto knife. We suggest weaving the hose where it's warm \u0026amp; then taking it out to your feeder.\u003c\/li\u003e\n\u003cli data-mce-fragment=\"1\"\u003eStretch out the net and starting at the seam of the open end, fold over the edge of the net to make 2 layers.\u003c\/li\u003e\n\u003cli data-mce-fragment=\"1\"\u003eStarting at the seam, begin weaving the hose thru every other opening of the folded over edge. Slide the woven net further onto the hose and continue until the net is completely woven onto the hose.\u003c\/li\u003e\n\u003cli data-mce-fragment=\"1\"\u003eInsert the connector into one end of the hose, add the clamp and tighten. Then connect the opposite end of the hose (temporarily) so the net doesn't come unwoven. \u003c\/li\u003e\n\u003cli data-mce-fragment=\"1\"\u003eThen set the assembled net inside your feeder. Slide the net over the hose so it is fairly evenly distributed around the inside of your feeder.\u003c\/li\u003e\n\u003cli data-mce-fragment=\"1\"\u003eNow figure out where you will be attaching the hose to the\u003cspan data-mce-fragment=\"1\"\u003e \u003c\/span\u003e\u003cspan data-mce-fragment=\"1\"\u003einside\u003c\/span\u003e\u003cspan data-mce-fragment=\"1\"\u003e \u003c\/span\u003eof the feeder. *Do not attach to the very bottom (when you lift the feeder the net may stay frozen to the ground) We suggest attaching it closer to the top horizontal rungs.\u003c\/li\u003e\n\u003cli data-mce-fragment=\"1\"\u003eStart attaching the hose to the feeder with the zip ties provided, about 1 ft apart, all the way around, making sure the net is evenly spaced. Once you know how much extra hose there is, cut off the excess, re-attach the connector \u0026amp; tighten the clamp. Then add more zip ties as needed.\u003c\/li\u003e\n\u003cli data-mce-fragment=\"1\"\u003eSet bale on its side (flat ends on either side), remove twines \u0026amp; set feeder over the bale.\u003cbr data-mce-fragment=\"1\"\u003eAll done!\u003c\/li\u003e\n\u003c\/ol\u003e\n\u003cstrong data-mce-fragment=\"1\"\u003e\u003cbr data-mce-fragment=\"1\"\u003eTips:\u003cbr data-mce-fragment=\"1\"\u003e\u003cbr data-mce-fragment=\"1\"\u003e\u003c\/strong\u003e\u003cspan data-mce-fragment=\"1\"\u003e\u003c\/span\u003e\n\u003cp data-mce-fragment=\"1\"\u003e- If the feeder is smaller in diameter than the hose, disconnect 1 end of the hose from the clamp, slide the net away from the open end of the hose \u0026amp; continue with step 5.\u003cbr data-mce-fragment=\"1\"\u003e\u003cbr data-mce-fragment=\"1\"\u003e- If your feeder is open or has rungs at the bottom, close it in with netting, belting, or puck board (if possible) before installing the EZ Feeder Kit. ** We now offer netting strips to help enclose the bottom of open feeders, install these on the inside of feeders so horses cannot paw + get caught on the net.\u003c\/p\u003e\n\u003cp data-mce-fragment=\"1\"\u003e- place your feeder in a spot that has wind protection\u003c\/p\u003e\n\u003cp data-mce-fragment=\"1\"\u003e- place shavings or straw before you set out your bale to prevent freezing \u003c\/p\u003e\n\u003cp data-mce-fragment=\"1\"\u003e- customers have set down railroad timbers where they plan to feed\u003c\/p\u003e\n\u003cbr data-mce-fragment=\"1\"\u003e\u003cstrong data-mce-fragment=\"1\"\u003eOther Feeder Types:\u003c\/strong\u003e\u003cbr data-mce-fragment=\"1\"\u003e\u003cspan data-mce-fragment=\"1\"\u003e\u003cbr data-mce-fragment=\"1\"\u003e- If you have a lightweight feeder, you can roll the feeder with the net kit attached to the bale and then set it over the bale.\u003cbr data-mce-fragment=\"1\"\u003e\u003cbr data-mce-fragment=\"1\"\u003e\u003c\/span\u003e\u003cspan data-mce-fragment=\"1\"\u003e- Another option for people with really big feeders is to not attach the hose to the feeder, drop the bale into the feeder, then set the net back over the bale and use velcro or re-usable zip ties, so you are able to attach + un-attach to the feeder as needed.\u003cbr data-mce-fragment=\"1\"\u003e\u003cbr data-mce-fragment=\"1\"\u003e\u003c\/span\u003e\u003cspan data-mce-fragment=\"1\"\u003e- Basket feeders are set up so the hose + net is removable to put hay in. Use velcro or zip ties that can be re-used to attach the hose to the feeder.\u003c\/span\u003e"}
TKKIT-EXFEEDER-1.5HD Kit-EZ Feeder- Large 1.5" HD


Related Products
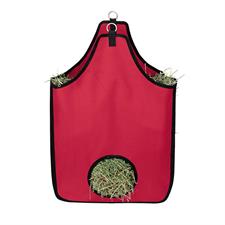


TKHB2 Nag Bag Hanging Bag 2"
$54.00